EXCLUSIVE FORUM FOR MACHINE DISMANTLERS AND REPAIR PEOPLE > Gary Indiana
> Self Propelled
> Air Brakes
> Under 150 PSI
> LASERLINE10' directreading opticalrod GR10T 4 surveying
LASERLINE10' directreading opticalrod GR10T 4 surveying
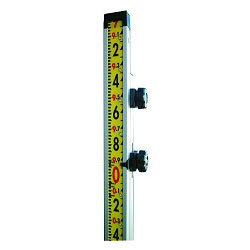
LaserLine 10-Foot Direct Reading Optical Rod GR10T for Surveying LaserLine 10-Foot Direct Reading Optical Rod GR10T
Aluminum Direct Elevation Rod for simplified computations that greatly reduce possibility of error.
This Direct Elevation Rod comes in two 5-foot sections that put together are 10 feet.
Collapses to 5.5' and extends to 10'. It has a 10-foot ribbon that can be locked in any position. This Rod comes in Feet/10th/100ths.Features
* Aluminum front and rear rods made of high-strength clear anodized aluminum for lightweight rugged, dependable operation. They will not rust, split, splinter swell or warp in any environment.
* Tape has heavy duty matte textured face which are easy on the eyes in bright sunlight and protects the tape numbers from wear and fading.
* Tape lock grommets are oversized heavy duty brass which greatly minimizes the problem of tape tearing.
* Solid tape lock with internal brake slide which makes for a strong, trouble-free operation.
* Tape lock pin cannot puncture tape is designed not to tear puncture or rip tape when pushed against tape face instead of the grommet hole.
* DuPont nylon parts which are tough and rugged for long-lasting life. Same material used for ski bindings and motorcycle parts.
* Includes Manufacturers 90 Day Warranty.
* Carrying Bag sold separately
1. Set rod foot on the elevation you wish to use as your reference; i.e. finish grade, subgrade, etc.
2. Run laser receiver up or down the side of the rod and / or raise or lower front rod section until you get the "on grade" signal on your laser detector.
3. Loosen the tape lock pin (lower knob) and disengage the tape lock pin from the tape grommet.
4. Roll the tape until the laser detector pointer is at zero (between the blue and red sections).
5. Lock the tape by engaging the tape lock pin into the closest grommet, then tighten the knob.
6. To determine the amount of cut or fill at any location within the range of your laser, set the rod down and find the "on grade" signal with your laser detector. Read across from the detector pointer and the tape will tell you how much to cut or fill.
"BLUE" section 1.75 feet. Existing grade is too LOW.
FILL 1.75 feet to get up to grade.
"RED" section .80 of a foot. Existing grade is too HIGH.
CUT .80 of a foot to get down to grade.
HOW TO READ TRUE DIRECTION ELEVATION ROD
1. Set rod foot on a benchmark or hub with a known elevation; i.e. 2,525.25 elevation.
2. Run the laser receiver up or down the side of the rod and / or raise or lower front rod section until you get the "on grade" signal on your laser detector. If you are using an optical instrument, site to the rod and use the horizontal line as your grade reference.
3. Loosen the tape lock pin (lower knob) and disengage the tape pin from the grommet.
4. Roll the tape face until 5.25 is across from the pointer on the laser detector bracket, or the horizontal line on your optical instrument. You are using the last whole number and the decimal numbers of 2,525.25.
5. Lock the tape by engaging the tape lock pin into the nearest grommet. Then tighten the knob. You have now locked into the rod elevation (2,525.25). All future readings will be true elevation above or below 2,525.25 (5.25).
6. To find an elevation, simply set the rod foot at any location on the job within the range of your laser or optical instrument. Run the detector and / or front rod section up or down until you pick up the "on grade" signal from your detector. Read the number opposite the pointer. That number is your true elevation. If using an optical instrument, just read the number across the horizontal line. That number is your true elevation.
Rod reading is 6.10 = 2,526.10 true elevation
Rod reading is 8.32 = 2,528.32 true elevation
Rod reading is 4.70 = 2,524.70 true elevation